Integrate the Planner to your Website
This section explains how to integrate the bathroom planner in a website through iFrame mechanism. It provides guidance to create the user's projects page, build the print command, display the price details and implement online buying.
iFraming Bathroom Planner
A website offering access to the bathroom Planner must embed it in an iFrame (Fig.1). There are 2 endpoints to use, depending on the reading direction : Left To Right (LTR) for latin languages and Right To Left (RTL) for arabic and hebrew languages. The routes to use are (match the case):
▪ Left To Right: https://xxx.by.me/Bathroom/
▪ Right To Left: https://xxx.by.me/Bathroom/indexrtl.html
The xxx part depends on the integration context. Please contact your 3DVIA counterpart for more information.
You can append some parameters to this endpoint URL, in order to give context to the planner. See the supported URL parameters 🔗 for more information.
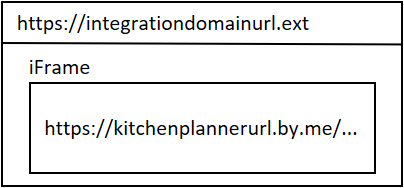 Fig.1: iFrame integration schema
Secure your iFrame integration
The ByMe platform checks consistency between declared domains of your legal entity and application integration domain. There are three kind of situations:
▪ If declared domains and integration domain are NOT CONSISTENT, application startup will FAIL with a CORS origin issue. This behavior prevents someone else embedding your application distributions.
▪ If declared domains and integration domain are CONSISTENT, application will launch NORMALLY.
▪ If no domain is declared, the application will launch with a warning: "Unsafe integration: Please review iFrame integration and domain declaration"
It is highly recommended that you declare your embedding domains to the ByMe platform by using POST /legals/domains.
Notice that if a domain is declared, the domain consistency is checked and accessing directly bathroom planner or editors from their urls do not work. The recommendation is to embed bathroom planner and editors within integration domains.
User's Projects Page
The integration web site displays page allowing user to manage his projects. Here are the useful API to build this page and manipulate the user's projects.
Retrieve the list of user's project : GET /projects/user/{userID}
Load a project by opening an URL composed of the bathroom planner URL appended with a projectid parameters and the project uuid as value.
Sample : https://bathroom.enterprise.by.me/?projectid=4144F45E-B9DA-35C0-90CE-60B9AA5DA418
Enable the optional action "delete a project" : DELETE /projects/{projectID}/user/{userID}
Enable the optional action "duplicate a project" to duplicate an existing project and all its parameters to a new project : PUT /actions/projects/{id}/duplicate
Retrieve project media, thumbnails, HQ renderings, 360 renderings with : GET /projects/{projectID}/media. See also GET /typemedia for possible media types.
Thumbnails are generated when the user saves the project, using the current point of view. Two thumbnails are generated with resolutions of 427x320 and 1024x768. The recommendation is to use the lowest resolution in the context of user's project page.
High Quality image and Panoramic rendering (360) generation are triggered through their own layer in the planner. In order to improve the quality of the preview it is recommended if available to use an High Quality image as the project preview.
Note: is not acceptable to use the same userID and token for several users :
- for security and user privacy reasons,
- since the number of projects per user is limited to 1000.
Project Page
The integration web site displays a project page. Here are the useful API to build this page and manipulate this project.
Retrieve basic information about a project, name, description, date of creation,... GET /projects/{projectID}
Retrieve project metadata, which contains manual notes, bill of material and total price (TBC) with GET /projects/{projectID}/metadata/{applicationID}}
From the project page, the user can modify the project name or description. Use PUT /projects/{projectID}.
From the project page, the user can modify the project notes. First display the existing project notes retrieved with
GET /projects/{projectID}/metadata/{applicationID}}. Second, once modified by the user update the project notes with
PUT /projects/{projectID}/metadata/{applicationID}}
The project page can display the media, thumbnails, HQ renderings, 360 renderings retrieved with : GET /projects/{projectID}/media. See also GET /typemedia for possible media types.
Need Mapping
Transmit user needs to the planner.
Before starting the planner, the integration web site may propose to the user alternatives of bathroom designs. By answering questions about bathroom shape, oven position, integrated or standalone fridge, the user expresses his needs. Those needs are used by the planner to select and filter the templates used to generate automatic proposals. This is called "Need Mapping". The goal is to increase the relevance of automatic proposals so that the user can find his dream bathroom in the first automatic proposals.
The user's needs and preferences are transmitted to the planner by using the iFrame message SetUpSettings with templateTags parameter.
It is recommended to send it when the planner starts but it can be sent at any point while the application is used.
Change need mapping choices.
In the second step of the bathroom design, while reviewing automatic proposals, the user may decide to change his needs.
The user then clicks the link "My bathroom needs" and the planner emits the event ChangeNeedMapping.
The embedding web site listen this event and once received displays a pop in. This pop in presents the user with alternatives to refine his needs. Those choices are converted in a new set of template tags. This new set of template tags are transmitted to the planner with iFrame message SetUpSettings with parameters hasNeedMapping and templateTags.
If the planner receives this message on step automatic proposal then it regenerates the automatic proposals presented to the user.
Price Information
During the bathroom design and sale process, increasing the confidence of the user is important. One axis to keep this confidence is the clarity on the price. The price displayed in the bathroom planner have an information icon (i). When the user click this information icon he expects to have detailled information on the price or a break down. The integration web side can provide pop in to display price break down with the business logic of the bathroom retailer.
Listen the iFrame messages emitted by the bathroom planner PriceInfoButtonClicked and EditorPriceInfoButtonClicked to display the price information pop in.
Product Information
A bathroom retailer may want to highlight his products in a specific way. This can be done with a dedicated Product Information pop in provided by the integration web site.
The information icon (i) is displayed on the products in the catalog if the commercial description commercialDescription is not empty.
The user click on information icon (i) of a product in the catalog, edit menu, or selected, the planner emits the event SpecialProductInfoRequested. The Bill of Material (BOM) of the selected product is included in the message.
The embedding web site listen this event and once received displays the custom Product Information pop-in. The pop in content is built from the BOM of the product. Additional product information or images retrieved from others online service can be used to build this content.
Item List
The button "Item List" in step Design you bathroom is used to display an appealing view of the product list. Each bathroom retailer may presents products included in the project with specific grouping and prices display. It influences how the consumer perceives the price structure of his project. This Item List pop in is not provided and has to be implemented by the integration.
The user clicks "Item List" button, the planner emits the event ProductListWithBOM.
The embedding web site listen this event and once received displays the Item List pop in. The content of the pop in is built from the Bill of Material (BOM) retrieved on the message ProductListWithBOM. See also Bill of Material Reference.
Need More Help
A bathroom retailer may propose additional help to the consumer during the bathroom design. An access link for this help can be displayed in the Help center. The bathroom retailer can use this link to start a chat, display a pop in to start a video call, request a call back, display information on local stores, book an appointment or request a brochure. Those capabilities are not provided and have to be implemented by the integration developer. Here are guidelines to implement such integration.
Make the "Need more help?" clickable link visible in help center in floorplan and design steps by configuring application distribution parameter additionalHelp.
The user click "Need more help?" link, the planner emits the event NeedHelpClicked. The embedding web side listen this event. If this event is received the embedding web side displays a pop in to request a call back. Any kind of help can be implemented with this pattern.
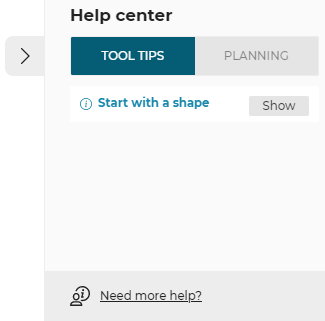 Fig.2: "Need more help?" access link in help center
Summary Step
A bathroom retailer can customize the summary step of the planner to help the consumer to finish their design journey with Proceed, Print, or Share. It can also be configured to present information for delivery, installation and financial options.
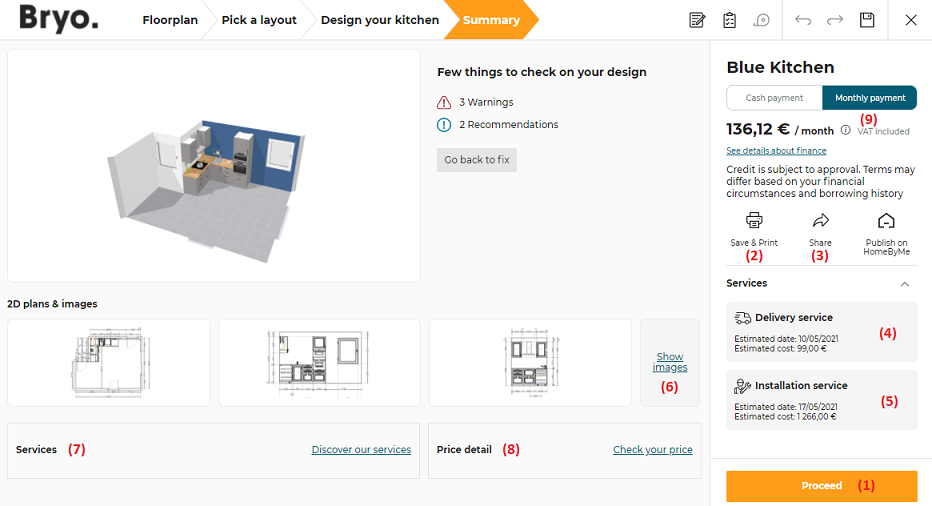 Fig.3: Summary Step
The elements of this screen that can be configured or customized are :
Proceed (1) can be customized to guide the consumer and close the transaction, see Online Buying.
Save & Print (2) can be customized to generate a printable document including 2D Plans , see Print.
Share (3) can be customized to implement sharing options, see Share.
Delivery service (4) is an optional module displayed by configuring the application distribution parameter delivery. Entering the summary step, the planner emit the event DeliveryInfoRequested. The embedding web site listen this event and once received reply with DeliveryInfoGenerated to provide estimated delivery date and price.
Installation service (5) is an optional module displayed by configuring the application distribution parameter installation. Entering the summary step, the planner emit the event InstallationInfoRequested. The embedding web site listen this event and once received reply with InstallationInfoGenerated to provide estimated installation date and price.
Show images (6) action triggers the iFrame message Images2DPlansRequested. The embedded web site listens to this event and once received displays a pop in to present the projects medias, images and 2D plans. This action can also be configured as an optional module displayed by configuring the application distribution parameter images2DPlans.
Services (7) is an optional module displayed by configuring the application distribution parameter servicesInfo. The link "Discover our services" trigger the iFrame message ServicesInfoRequested. The embedding web site listen this event and once received displays a pop in that provides information or actions on additional services.
Price detail (8) is an optional module displayed by configuring the application distribution parameter priceDetail. The link "Check your price" trigger the iFrame message ProductListWithBOM. The embedding web site listen this event and once received displays the Item List pop in. It is the same as clicking on Item List icon.
Monthly Payment (9) is an optional module displayed by configuring the application distribution parameter finance. Depending of the durations, interest rate and initial deposit the consumer can be informed of the possible monthly payment.
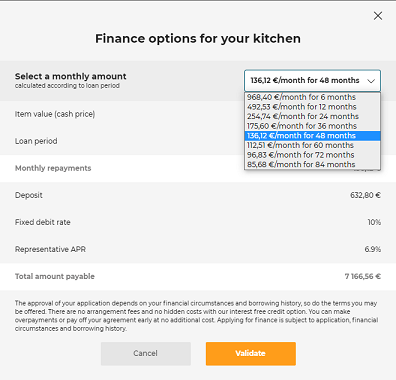 Fig.4: See details about finance pop in
The printing of the project is implemented by the integration developer in order to respect the way in which the bathroom retailer wishes to present the project to the consumer. Usually the print creates a document containing bathroom retailer logos, project snapshot, product list with prices, 2D Plans and notes. The project print is used by the consumer to make a purchase decision but also by the bathroom fitter to install the bathroom in consumer's home.
Events Sequence
The user clicks "Print" button. The planner emits the event
PrintButtonClicked.If the project is saved the planner emits a second event
ProjectSavedRequestForPrint.The embedding web site listens to the events
PrintButtonClickedandProjectSavedRequestForPrint. If both events are received the project is saved and ready to print. The embedding web site displays the print layer and starts collect data to create the printed document. Go to Step 5.If only the event
PrintButtonClickedis received the project is not saved and cannot be printed immediately. The embedding web site has to trigger the save on the planner by sendingSaveRequested, in response the planner emitsSaveSucceeded. On receiving this event the embedding web site displays the print layer.postMessage("SaveRequested", { from: "bryo", action: "print" });Print layer collects the data from the planner and build the printed content. Depending of the data required, it triggers messages and listens to their responses. Bill Of Material (BOM):
BOMRequested,ProductListWithBOMRequested. Snapshot, visual illustration of the project using the current camera point of view :SnapshotRequested,SnapshotGenerated. 2D Plans from top, for each face of the project, for worktops, wallpanels and walledgestrips, see detailled options in:Compute2DPlans,Plans2DStart,Plans2DStop. Cross cut images of cabinets :CrossCutImagesRequested,CrossCutImagesGenerated,CrossCutImagesNotSupported. Design notes on the project :ManualNotesRequested,ManualNotesRequestedSucceeded. Notes on specific items are located in BOM in theitemNoteattribute.
The print content is generated by the integration to present data and images with the proper layout. 2D plans and cross cut images can be customized using parameters in the request messages.
 postMessage( 'SnapshotRequested', {});
 postMessage( 'Compute2DPlans', {
     version: 1,
     topPlans: 1,
     facePlans: 1,
     groundFurnitureTopPlans : 0,
     wallFurnituresTopPlans : 0,
     worktopPlans: 1,
     wallpanelPlans: 1,
     wallEdgeStripsPlans: 0,
     saveWithProject: 1,
     showFurnitureDimension: 1,
     showWallDimension: 1,
     showNumbering: 1,
     showCutouts: 0,
     saveWithProject :1,
     resol: 300,
     scale: 20,
     imageWidth: 2244,
     imageHeight: 1772
 });
- Print layer displays the generated content to the user for review and adjustment. It presents a button to send the document to the printer or to retrieve it in PDF format. The user clicks this button to obtain the document.
Share Project
A bathroom retailer may propose to the consumer to share his project with friends, family or followers. Each retailer defines the share options available to the consumer. It could be a simple project URL available for copying or a wide choice of social networks. Publication to social networks is not provided and has to be implemented by the integration developer. Here are guidelines to implement such integration.
Make the "Share" button visible in summary step by configuring application distribution parameter sharing.
The user clicks "Share" button, the planner emits the event ShareProject. The embedding web side listen this event. If this event is received the embedding web side displays a pop in (Fig.2). This pop in presents the user with several options to share his project.
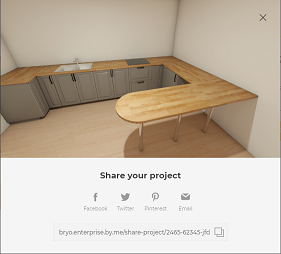 Fig.5: Share pop in sample
First option is to display a sharable project URL to the user for copying.
The URL is generated from the embedding web site URL by appending a parameter "projectID" with the value retrieved on the
message ShareProject projectID. Refer to Load Project for a URL sample. The user copy this link and paste it in any communication channel, email... Any person receiving this link can click it to open the project in bathroom planner.
Second option consists to publishing one image of the project on social networks. An image of the project can be retrieved on the message ShareProject image. This image is either a snapshot or a HQ rendering. The integration can propose to publish this image to different social network using their respectives API.
More advanced publication options can be implemented based on the media available for the project. The integration may propose to the user to select one or several project media - snapshot, HQ rendering, 2D View, 360 rendering - and to share those images on a social network. Project media can be retrieved using GET /projects/{projectID}/media. See also GET /typemedia for possible media types.
Online Buying
A bathroom retailer may propose to the consumer to buy his bathroom project online. Each retailer defines his own consumer journey for online buying from simple to more complex. The integration flow detailed hereafter is a sample that includes a validation by a bathroom specialist.
Events Sequence
The user clicks "Proceed" button. The planner emits the event
ShareProjectBOM. If the project is not saved the planner displays a pop in to propose to the user to save the project and then emits the event.The embedding web site listen to the event
ShareProjectBOM. If this event is received the embedding web site displays a pop in. This pop in presents the user with several ways to continue his consumer journey.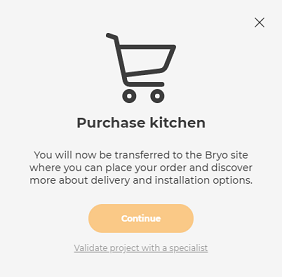 Fig.6: Proceed pop in sample
First option is to place an order on the retailer web site. The Bill Of Material (BOM) of the project retrieved from the event
ShareProjectBOMhave to be transferred to the web site. This BOM is the input to fill the shopping cart with references used in consumer's project.Second option is to request a validation by a bathroom specialist. If the user selects this option, he fills a form to request project validation. He enters personal information, email, telephone, allowing the bathroom specialist to contact him. Project ID and User ID are added to the form. The integration developer has to manipulate and store those data according to personal data protection rules and best practices. When the user submits the form the project has to be locked to prevent any further modification before the review and the project maturity has to be set to "Under Review". Those operations can be done using PUT /actions/projects/{id}/lock and PUT /actions/projects/{id}/lifecycle. Notice that the Lifecycle API allows mapping the project lifecycle information as an integer in the ByMe platform. ByMe platform do not implement behaviors related to this lifecycle value. Each integration can define freely the project lifecycle, number of value and meaning of each value.
After submission, The user is informed that his project is locked for review and validation. This can be implemented using the iFrame Message
DisplayNotification. Same notification can be displayed during the next opening of this project.The bathroom specialist access to a backend to manage the projects submitted for review. From this backend the bathroom specialist selects the project to validate. The backend starts the selected project with impersonation of the user by using a use token. That's means that the bathroom specialist starts the planner with the user's project as if he were the user. This backend is developed by the integration developer. It can be as simple as a mailbox containing the submitted validation forms or something more complex to manage validation requests for multiple countries by a team of specialists. Refer to Authentication Mechanism and POST /tokens to create the user token.
The bathroom specialist reviews the project in the planner. He may contact the user to discuss the project. He does modifications to apply the best practices of bathroom design and fix warnings in help center to obtain a validated project. The bathroom specialist saves it as a new project because the project has been locked previously. He can validate the project and this new project can also be locked. Those actions can be implemented using the same API on project. The project maturity "Validated" can be set on the new project using the lifecycle value. A different project maturity "Discarded" can also be set on the initial locked project.
This new project is associated to the user that has requested the validation. The user is able to see this new validated project in his project list. The user can open the validated project, review it and if satisfied can proceed to purchase. At open of this project the user can be notified that his project is validated. This can be implemented using the iFrame Message
DisplayNotification.
HQ and Panoramic Rendering
A bathroom retailer may increase the consumer engagement by proposing realistic images of the bathroom project. The ByMe platform can generate High Quality images and Panoramic images (360 degrees). This section describes how to activate and integrate those capabilities. Due to significant computation cost of high quality and panoramic rendering, the pricing model is specific and has to be understood before activating those capabilities. A system of prepaid credit is used for panoramic rendering. Contact a 3DVIA representative if needed.
The user creates an image in step "Design your bathroom" by clicking in menu "Create Image" the item "Create a realistic image".
The item "Create a realistic image" availability and image resolution can be configured using the parameter hqRendering in application distribution. Notice that image resolution influence directly computation costs.
The menu item "Create Panoramic Rendering" is made available to the user by using the application distribution parameter 360Rendering.
The user adjusts the point of view, the sun position and the background image and requests image generation. The image is generated on the server and after few minutes or more; the image is associated to the project as a new media. See also Create Images.
The user can be notified when the high quality or panoramic image generation is finished. This capability is not provided by default and has to be developed as part of the integration with the embedding web site. Each bathroom retailer may want to inform the consumer with different touch point, email, SMS or other means. This is why the ByMe platform provides an enabler mechanism that has to be completed by the integration. This mechanism rely on AWS Simple Notification Service. The image generation for a Legal Entity is a SNS topic on which it is possible to subscribe with a HTTP/S endpoint. Other SNS notification mechanisms are not available. The integration developer has to create a web hook to catch the notification. At reception of such notification, the web hook processes it to communicate by email, SMS or smoke signals to the user that he can enjoy the freshly generated image.
Manage the subscription of the endpoint with the API POST /hqrendering/notifications/subscribe , GET /hqrendering/notifications/listsubscriptions and POST /hqrendering/notifications/unsubscribe.
Notice that the web hook on subscription URL must be in place before subscription. Subscription must be confirmed by clicking on link included in the first notification sent. After subscription confirmation the notification system is configured. When a high quality or panoramic image is finished and associated to the project, a notification in JSON format is dispatched. All subscribed end points receives it. A rendering is followed by a notification only if this rendering has used or would have used credit to be rendered.
Notification sample:
{
  "type": "render_hq_ready",
  "variables":
  {
    "project_id": "DE211A64-1AF0-4231-86EF-C49E0C4447F5",
    "image_id": XXXXXX,
    "user_id": XXXXXX
  }
}
The possible values for “type” are:
• “render_hq_ready”: the image has been computed and associated to the project and the credit has been deducted from the user.
• “render_hq_black”: the image generation failed because the resulting image would be completely dark. This usually happens when the user placed the viewpoint inside a furniture or a wall.
The end point implementation uses the user_id to retrieve the contact details of the user (email, mobile phone) from the bathroom retailer's customer account system. It then generate and sent the proper message to the user.
Open project from render viewpoint
A bathroom retailer may choose to create a page on their website displaying inspirational images to their users. These images if created as renders from the solution, can link directly to projects within the bathroom solution, matching the same viewpoint that the render was created. By opening a project in this way it not only helps a user start from inspiration, but creates a clean transition between the retailer's website and bathroom solution.
To use this feature the bathroom retailer will need to load a project by opening a URL composed of the bathroom planner URL appended with the projectid parameter (the project uuid as value) and the HQRDbID parameter (the media id as value).
Sample : https://bathroom.enterprise.by.me/?projectid=4144F45E-B9DA-35C0-90CE-60B9AA5DA418&HQRDbID=111111
A bathroom retailer can retrieve the media id for all media for a specific project with : GET /projects/{projectID}/media.
Cookies and Browser Storage
The purpose of this section is to precise the bathroom planner usages of cookies and browser storages. Especially regarding data kept by the browser when the application is closed.
Cookies
None.
Local Storage
hbm-webapp-project__uXX_pXXXX
This key is used to store a copy of the project in the browser local storage. It is used when the browser session is interrupted while the project is modified and not saved. After interruption, if the user restart the bathroom planner, s/he is prompted and s/he can select to restart his project from this local copy. This project copy is updated after each modification and cleaned-up after a save.
Session Storage
None.
